So you bought a farmhouse fixer- upper with old flooring and are starting to realize the costs, even with DIY, add up at lightening speed.
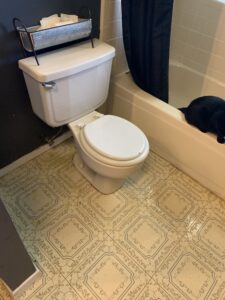
AHHH! Us too! We bought a little ranchette four years ago that needed (and still needs) considerable updates, but has unbelievable potential. Slowly, we are redoing, fixing and updating it DIY style adding that sought-after farmhouse look. SLOWLY…meaning, we have a budget tighter than the boys’ lips when asked who broke my grandmother’s crystal vase. But who doesn’t want a beautiful home, right? One of my ULTIMATE NIGHTMARES was the boys’ bathroom. Hideous vinyl flooring straight out of an old cat lady’s house (cat smell included) glared at me every time I dared enter. I needed a farmhouse flooring fix, but a super cheap one.
Enter, The Southern Fix! I decided to paint the vinyl…. YES, that’s correct. Paint the vinyl flooring giving it a cozy farmhouse styled pattern. I thought my husband was going to have a heart attack when he walked in half way through the first coat of primer. I seriously contemplated just telling him I was almost finished. However, reassuring him it will look great and update the whole bathroom is the route I took. The boys were so excited and cheering me on from the doorway. The cowboy? Well, he often requires a lot more convincing.
Ever the contractor, maintenance supervisor and over all project manager, he asked me if I had prepped the floor. I told him with as straight of a face as I could muster,
“Well, no, me and the boys just wanted to get on with the project and that would have taken too much time for me to actually clean it first.”
It’s all in the prep work, according to the cowboy. Here’s how I prepped the flooring…
It’s always satisfying to keep him guessing as to when I’m joking or not. As super tempting as it was to just prime over two weeks worth of little boy pee surrounding the base of the toilet, I prepped the floor. I thought it best to actually clean the disgusting missed aims of midnight bathroom runs, muddy boot prints and tracked in chicken poop and goat pellets off the vinyl. Let me tell you, I’m a bit of a clean freak, but there is no amount of cleaning that can keep up with the bathroom of two ranch hands under the age of ten. So first, I donned my hazmat suit, as is necessary to enter most little boy’s bathrooms, and cleaned the floor with dish soap (because it has a de-greaser) and water.
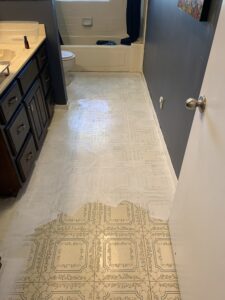
The next step is the primer. Priming with three layers of indoor/outdoor primer did the trick. Using a foam paint roller will get you the most coverage for your time. This vinyl has an embossed pattern (ohhh, fancy) that still shows under the primer; however, it does not deter from the overall finished product and I feel actually adds even more farmhouse charm. I let the primer dry for several hours using a large box fan to help the process along faster.
Finally… on to how you can DIY farmhouse flooring using a beautiful stencil pattern!

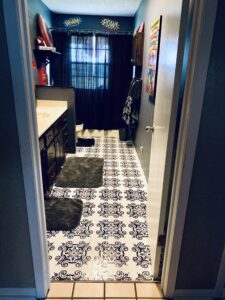
Next was the fun part! I found a 12 X 12 stencil at my local craft store with a folk-art pattern I liked. I bought three because I knew I would have to cut some in order to fit around the toilet and bath. Next, I used Waverly Chalk paint in the color Ink. I just lined up the stencil over the previous vinyl “grout” lines because they were uniform and properly measured. Then, I began to stencil away.
It was at this point the cowboy came back in and said, “Oh, I see. You didn’t tell me you were going to stencil it. That looks pretty awesome.” Enter satisfying grin! I cut the extra stencils to have a uniform fit around the toilet and tub. I did have a few stencil mishaps I simply went back in with a small paintbrush dipped in the primer to correct. In the final product, you have to look really hard to find them. Sometimes, the stencil lines were not perfect or crisp. However, I again think this nods to the fact it is hand-done and adds a distressed charm to the overall finished look.
Finishing up…
Again, I let the paint dry several hours with the help of the box fan. The finishing task was to apply a polyurethane sealer over the entire floor using a foam roller to get a clean soft finish. For this part, open the window and use the fan for ventilation if you have one. I aired out the bathroom for 16 hours to ensure it was dry and had no more fumes. After all was said and done, there were some spots I missed with the polyurethane I went back over with a small paintbrush to finish. The final product was very satisfying… even to the cowboy! All of this for under 75$. WOW, what an inexpensive Southern Fix!!! Continue to follow our Blog for more updates to the boys’ bathroom coming soon!
What Southern Fixes have you used in your own home? Do you have a DIY farmhouse flooring fix? Share with us in the comments!